
Last updated on August 13th, 2022
Many brands nowadays boast that their welding machine has a 2T and 4T feature but have you ever wondered what exactly is this and the difference between 2t and 4t? If not, I’m going to explain each and everything in detail.
The ‘T’ indicates the “touch” which means how many times you need to push the torch trigger to start and end the welding. This feature is almost the same on TIG and MIG welders with a bit of difference.
The 2T stands for two touch, and in this mode, all you have to do is push the torch trigger to start welding and release it to halt the welding. This setting works perfectly in short welds.
4t stands for ‘four touch’, and in this mode, just press and release the torch trigger to start the welding without holding a trigger. Again press and release the button to stop the welding process. The 4T feature is ideal for long welds.
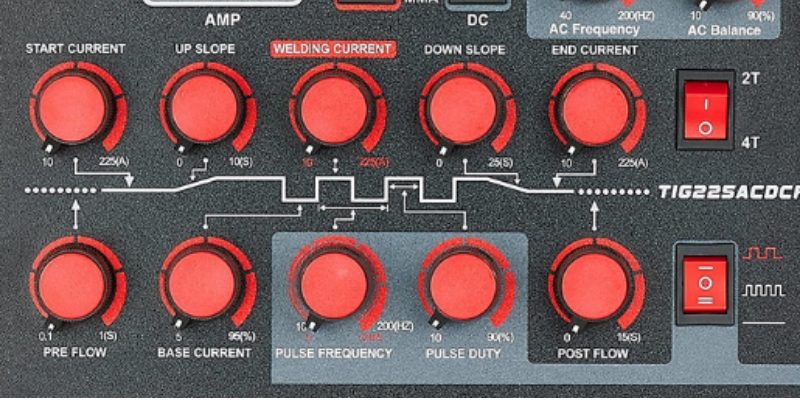
Remember, before using these modes, use the pre-settable features such as upslope, downslope, starting amps, and ending amps to manage the weld from starting to end correctly.
Contents
When to use the 2T and 4T attributes?
This is an intriguing question that many newcomers have, and the answer is below.
When working on short welds, such as welding on small workpieces, tack, or stitch welding, 2T mode can be used. This mode has the benefit of allowing you to execute the short welds quickly and easily.
When welding on large ships, circular pipes, or rebuilding a large truck, the 4T mode is commonly utilised for long welds and hard-to-reach spots where you can’t readily hold the torch trigger. Without a doubt, the 4T mode has made long welds much easier and more comfortable.
2T vs 4T in TIG Welding
The 2t and 4t features on TIG welders are intended to substitute the foot pedal. The 2T and 4T work with the machine’s amperage pre-set, whereas the foot pedal offers you to control the amperage level manually.
2T in GTAW Welding
You adjust the amperage rate, so the machine will gradually reach the set level. You can also adjust the ramp-up and ramp-down time, so the machine can’t get the set welding amperes quickly, preventing the burning of metals, especially thin metals.
4T in GTAW Welding
You need to adjust more settings in this mode because you have to control the welding cycle properly. Set the initial amps on which you want to run your unit before reaching total amperes. Before upsloping to full working amps, these starting amps will warm the metal.
To activate the starting amps, push and keep the torch trigger, then release it to begin the upslope to working amps. For finishing the process, press the button and leave the torch trigger to end the arc.
2T vs 4T Feature in MIG Welding
These features are not optimized as an alternative to any component in this welding. They are designed to add more functionality to MIG gun. Instead of TIG welding, the 2T and 4T modes on MIG are straightforward, and you don’t need any upslope or downslope setting. The 2T function does not really exist in MIG welding, and it’s just like that press to start and release to stop the process.
4T in MIG welding
It’s the same as TIG welding, but it has no pre-starting setting. Click the ‘4T’ button on the machine, push the torch trigger to initiate, and release the button to begin the process. To finish the process, do the same. 4T allows you to weld in the long run.
Frequently Asked Questions
Q1. Can we use 2T and 4T modes and foot pedal in TIG welding?
No, you can only use these functions or foot pedal, you can not begin with both. If you have selected 4T mode the, you are bound to use only 4T mode. If foot pedal is selected then, you can’t use these features.
Q2. What is required to start the TIG welding with these modes?
In TIG welding, some pre-settings are requires such as pre/post flow, up/down slope, starting and end amps, to begin the welding. In MIG welding, set the starting and end amperes to start the process.
Final Remarks
It was all explanation about 2T vs 4T welding, and both modes have their benefits according to the type of the work. TIG welding is complex, so 2t and 4T modes setting is challenging, but it is quite easy with MIG welding. I hope this article clears up any misconceptions you may have had.

- How to Use a TIG Welder? Ultimate Guide and Expert Tips - March 14, 2023
- What is a TIG Welder? – Everything You Need to Know - March 11, 2023
- Ahp AlphaTIG 200X(updated 203XI) Review for 2023 - February 7, 2023